Using "table" you can create rows of cells that will always move together, keeping audio and video or dialog and speakers together. "Column" format is intended for newspaper type columns where text flows from the bottom of the left column to the top of the right column, which can make a mess of your script.
If all you need to do is type a multi-column script and you know that no changes will be required, you can set it up with tabs. This works great until you try to change something.
Downloadable Files.
To help students using MS Word to prepare their scripts, a "template" for the real-time script format required for TVR 055 has been created. The script "template" available for downloading from this page is not a true template as the term is used by Microsoft. It is a sample script with all formatting automated as far as possible, allowing the student to overwrite some headings and then just tab from field to field and type copy as desired. There should be enough cells to accomodate most final projects as well as the advertising copy assignment.
Please note that this template will only work with genuine copies of MS Word. Other programs including MS Works (with the exception of a few versions that included a full version of Word as the word processor) will not recognize the formatting. Many programs say they are "Word compatible," but they compose in their own proprietary formats, and then use a translator to output something that MAY be recognizable by MS Word. This could be helpful if you need to compose at home and print in a KU lab, but if you are using any other word processor, you will have to figure out a how to create a 3-column format similar to the PDF file available from this site.
This template has been tested with a number of versions of Word from 1997 through 2010 for the PC, and through 2011 for the Mac. It will NOT work with versions earlier than 1997. Diagrams in this guide are all from Word 2010 for the PC running under Windows 7.0.
To download the file, simply click the icon below. Most modern browsers will give you a choice between saving the file or opening it. Opening the file in Internet Explorer may be a problem, as it often opens an abbreviated version of Word which will allow you to view the file, but will not give you full editing capabilities. In most cases you are better off saving the file to your hard drive or desktop. Many browsers will do this for you, saving to a folder called "Downloads" accessible under your personal "Documents" folder.



There is no standard width for the left and right margins for scripts. For this class we will use one inch (1"). This allows space for the director or talent to make notes, yet allows for a reasonable amount of copy per page. Top and bottom margins are less important. The template uses relatively small top and bottom margins, but students may alter these as desired.
All scripts must be printed in 12 point type in either Times or Courier fonts. Times (called "Times" on the Mac and "Times New Roman" in Windows) is the basic font of business and the professional world. New copies of Word may default to 10 point Times, but 12 point is the smallest size easily read and must be used in this class. The newest versions of Word may default to a font other than Times, however the "templates" should automatically select the correct font and size. Be sure to confirm that this happens.
Courier is an old-time typewriter font that has the advantage of being mono-spaced, meaning that each letter is the same width.
Be aware that some "old-timers" in media may require this font, called "Courier" on the Mac and "Courier New" in Windows because it makes it easier to estimate run-time from script length.
Format.
The following stylistic elements are required for scripts used in TVR 055 regardless of what software is used:
1. Each video shot description includes 3 parts: a transition (spelled out in full), a video source either spelled out or abbreviated in a way that cannot be confused, and a shot description including the size of the shot and its contents. For example: Cut to Cam #3, MS of John and Mary (NOTE: Color for illustration purposes only--scripts are always printed in BLACK).
2. Video directions are written in upper and lower case (called "Sentence Case" in Word), single spaced. Note that some texts call for video information to be in all CAPS, but this is hard to read and is not acceptable for TVR 055.
3. The script is backtimed in the center column, meaning that the time in line with the first shot is the total run-time for the program, and each succeding shot has a time that would show on a down-timer when that transition is called for. The video will fade to black at 00:00. Time is written in xx:xx format (representing minutes and seconds, with leading zeros, if necessary).
4. In the right hand (Audio) column, speakers' names are typed in CAPS followed by a colon. They should be flush left within the cell, and even with the shot description and time.
5. Spoken dialog is typed upper and lower ("Sentence") case, directly after the colon following the speaker's name and all audio information is double spaced. Note that quotes are never used to denote dialog in scripts.
6. Talent instructions are typed all in (CAPS), underlined and in parentheses, and are placed at the appropriate point in the audio column.
7. Music and sound effects information is typed all in CAPS, underlined, and is placed at the appropriate point in the audio column.
8. Every time a speaker changes within a single video shot, a carriage return (extra double space) is inserted.
9. Audio is always kept even with its associated video shot information, and a sentence may be broken across shots in the audio column. The video shot is the controlling factor in this script format!
10. Never break a video shot or its accompanying audio (one row of your table template) across two pages. The instructor's template is formatted to prevent this automatically.
11. Each page should have a 4-line header consisting of Client, Title and Page Number (usually Page "X of Y" format) on the first line, Writer on the 2nd line, a horizontal line across the whole page on the 3rd line and column headings for VIDEO, TIME and AUDIO , in caps, bold face and underlined on the 4th line. A carriage return above these column headings makes the header look a bit nicer.
The screen image produced by the Word template for this format looks something like this:

Many script formats require a cover sheet, usually giving some additional information about the intended target audience and production notes. In TVR 055 the Treatment will serve this function.
1. Open MS Word (any version from Word 97 through the latest version should work).
NOTE FOR MAC USERS: While Word 2010 for the PC and Word 2011 for the Mac appear and function very much the same, there is one significant difference. In the PC version the "program" includes all the formatting toolbars and a blank (usually light blue) background, over which documents are displayed. In the Mac version, the "program" displays as a tiny, blue band across the top of your screen. The toolbars and everything else that users think of as Word are attached to the document! The copy on the classroom Mac launches with NO open document--so a clutter of icons that make up the KU desktop appear to fill the screen. Either double click on the "Word Document" icon, or press COMMAND-N for "New Document."2. In Word, find the dialog box for "AutoCorrect" (Under File, Options and Proofing in Word 2010, under Word and Preferences in Word 2011 for Mac) and unselect "Capitalize first letter of sentences" and "Capitalize first letter of table cells" by clicking on the appropriate boxes until they are NOT checked.

3. Open the template you want to work with. It will probably have a yellow band at the top indicating that you are in "Protected View." Click on "Enable Editing" to allow you to work with the file.

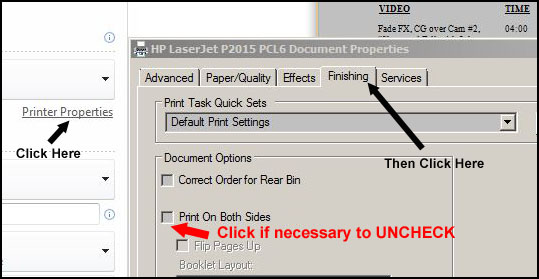
4. Immediately use "Save As" from the File menu and give your script a new name. If you forget to do this and save it as the template name, you can download a new blank template from the class Web page, but this is a hassle you can easily avoid.5. In order to see spacing and carriage returns, make sure that the "Show Formatting" option is selected in your toolbar. It is activated by a button containing an icon that looks like a paragraph symbol. This is also a good time to confirm that the font is set correctly to 12 point Times.

6. In order to see the header information, click on the "Print Layout View" button in the lower right hand corner of your Word screen (lower left corner on a Mac).

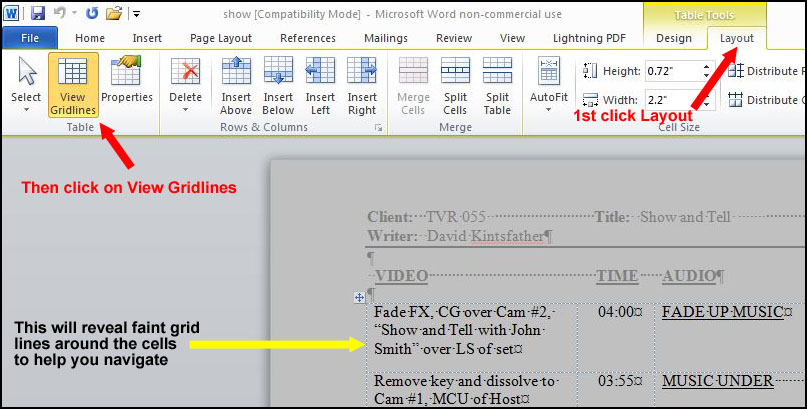
7. In order to see the gridlines around the table cells in your document, first click on "Layout" under Table Tools, then click on "View Gridlines." On a Mac, click on "Table" and click beside "Gridlines" until a check appears.
8. To edit the header information, double click anywhere within the header and it will become black, with any copy you have typed becoming grayed out.

9. Place your cursor at the appropriate point in the header and use backspace delete to back up over the generic copy. Then type your own copy. Once you have finished with line one, add or delete spaces before Title: and Page: to align the Title: entry correctly with the next line or table (over the word TIME if using the class template) and to place the terminal page number just at the right margin.10. Be sure to type your name after Writer: on line 2. NOTE: Forgetting this is the most common error made by students using this template. Once the header looks correct, double click anywhere below the header to gray it out and allow you to type copy.
11. In general you don't want to use carriage returns (ENTER/RETURN key). Type as much video information as needed, and the formatting will keep it single spaced and in the correct column.
12. Tab or use the right arrow key to get to the time column (Tabbing may be better, as it will insure that the Time is correctly aligned with the TOP line of the Video and Audio cells). Then simply type the appropriate 4 digit time with a colon in the middle.
13. Again tab or use the right arrow key to get to the audio column. Then just type, remembering to capitalize speaker's names and format audio and talent cues correctly. Dialog will be double spaced automatically, and the formatting will not allow a shot (row of cells) to be broken across two pages. End the audio when the video changes, even if it is in the middle of a sentence.
14. Only use a carriage return if the speaker changes within one video shot.
15. The script template is set up with 50 rows of cells. This number was chosen because it should provide for about 5 minutes of copy, adequate for the final project in TVR 055. When you reach the end of your script, you will need to delete the remaining cells before you save and print your script. Failure to do this will often result in a 2-page script with page numbering ending in "Page: 2 of 6," which will result in a grade deduction. Prevent this problem by doing the following:
a. Run your mouse along the left side of the first row of cells to be deleted. A small, black arrow should appear in the margin pointed inward toward the left-hand cell.See diagram below:b. Click on the left margin of that cell.
c. Next hold down the Shift and press the Right Arrow key to select the entire row.
d. While still holding the Shift key down, press the Down Arrow key until you get to the end of your table. Be careful NOT to select the carriage return that follows the table, or you will lose the Table Tools in the tool bar. If you accidentally select this symbol, hold the shift key and press the UP Arrow key once.
e. Now click on "Layout" in the Table Tools menu bar and select Delete and then Delete Rows. On a Mac, click on "Table" in to top tool ribbon, and then on Delete and Delete Rows.
f. Note that Cut from the Toolbar will remove text from selected table cells, but NOT the cells themselves. Only Table Tools allow you to add or delete cells from your script, which is essentially a big table.
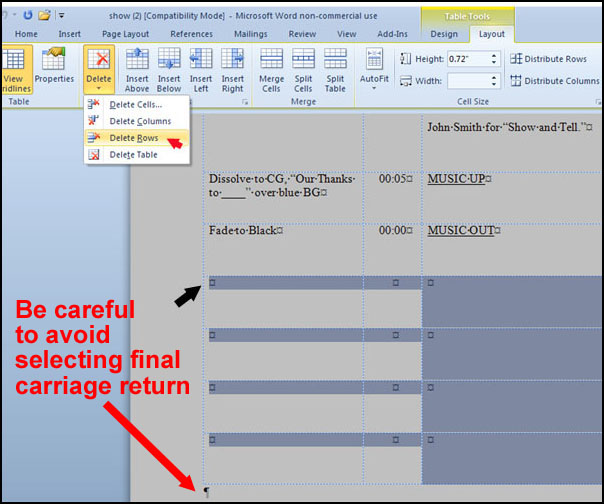
This technique can also be used to delete an individual row of cells anywhere in the script.With a little trial and error, shots (rows) can be added as well as deleted, but it is easier to delete them.
16. The last thing you should do prior to printing your script is to spell check it. While Spell Check is not infallible, it can help you catch mistakes. Grammar Check is usually a waste of time because the grammatical conventions of scripts are different from those of other documents. Most versions of Word perform Spell Check as you type, and questionable words are underlined in red. If in doubt, check a real dictionary.
