Using the Grass Valley Kayak Video Switcher

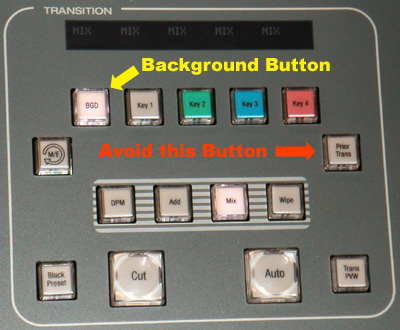
The Grass Valley Kayak is fairly easy to operate, but it is so powerful that some care must be taken to set it up for desired functions prior to beginning a production. It is critical that the BGD (Background) button in the Transition section be lit for most normal operations.
If you are not beginning with a key, no ON lights should appear below the four key buttons to the right of the BGD button.
The PRIOR TRANS button to the right of the KEY 4 button can cause special problems because it is not a toggle and affects many aspects of switcher operation. If it is accidentally depressed, press the BGD button to deactivate it, as pressing it a second time will have no effect!
2. Basic Transitions
To Set up: press BGD, then press source in the Preset Bus (white buttons)or prepare to press source in the Program Bus (cranberry buttons). To Activate: press CUT or press source button in Program Bus.
To Set up: press BGD and MIX, then press source in the Preset Bus.To Activate: move Fader Bar or press AUTO.
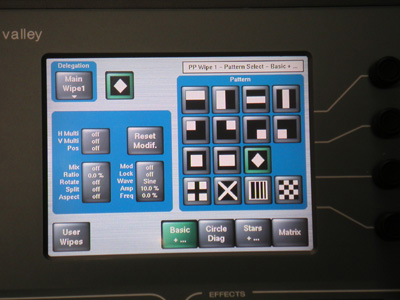
To Set up: press BGD and WIPE, then press sources in the Program & Preset Buses.To Select Pattern: Press WIPE on the touch screen menu if it does not activate automatically.
Press PATTERN SELECT icon and select a type button below the pattern icons.
Generally you want to start with the BASIC button which will turn green when touched. Then select pattern icon desired. The icon selected will show a green border in the touch panel screen and also be displayed in the upper left.
Border size and softness can be adjusted with the knobs to the right of the touch screen menu.To Preview: press TRANS PVW to right of AUTO button. Then press AUTO once or move the fader bar and watch the Preview monitor.
To Activate: move Fader Bar or press AUTO.
To Set up: prepare to press FTB AUTO button.To Activate: press FTB AUTO button (fades from black when button strobes off and on).
3. Auto Transitions
To Set up: set transition rate by holding the TRANS DUR button down and performing the transition.
Then enter the desired rate in frames on the numeric keypad which will light up.To Activate: press AUTO.
To Reverse: press AUTO again.
4. Downstream Keying
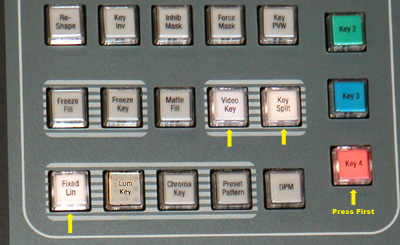
To Set up: press the CG button in the Key Bus and then the red KEY 4 button, either in the Delegate Bus or in the Keyers section.
Next press the following three buttons in the Keyers section:VIDEO KEYIf any other buttons are illuminated in the Keyers section, press them to deactivate them.
KEY SPLIT
FIXED LIN
Clip and Gain are adjusted automatically to produce sharp edges when in the downstream mode.To Activate: press KEY 4 CUT or KEY 4 MIX (making sure you have the mix speed set as desired).
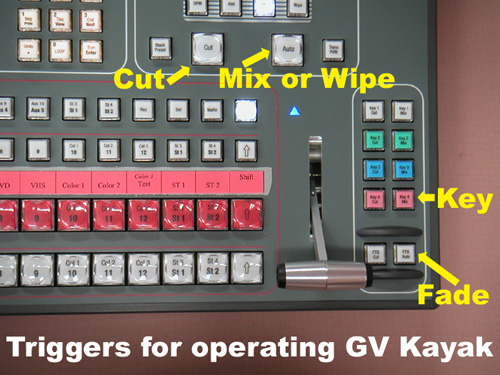
5. The Triggers
All of the basic functions listed above can be activated by four buttons which may be considered the "triggers" of the switcher, as shown below.