Using the Sony 2000 Editor in the Van for Basic A/B Roll Editing

A/B roll editors are actually computers which control video tape machines. Information about what the machines are doing and what type of edit you want to perform is presented on a computer monitor mounted in front of the Sony 2000 Edit Controller.
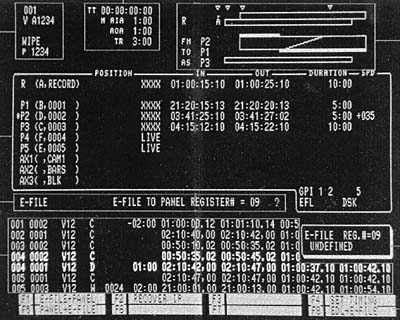
The top of the screen shows (from left to right) the number of the edit, the mode (ie. V A12), the amount of time already completed (helpful for projects which must be a defined length), and the transition programmed including machines involved, length of the transition and for wipes, the pattern selected.
The center of the screen shows the position (time code address) of the tape in each machine, and any in and out times which have been defined.
The bottom of the screen shows an edit decision list (EDL) for edits which have been recorded. As new edits are added, the list scrolls off the top of the screen, but you can recall any edit in the list using the recall mode explained later in this handout. For some reason Sony does not include headings for the items in the EDL. They are (from left to right): edit number, source, transition (Sony calls these "effects"), pattern (for wipes), duration of the transition (Sony calls this "transition"), source in time, source out time, record in time, and record out time.
All of the information in the EDL can be saved to a floppy disk using the dump function and reloaded into the editor's memory at a later date using the load function. Since the EDL contains no information about the content of any of the shots, it is very helpful to keep a handwritten EDL with edit numbers and shot descriptions at a minimum. For the most security, use the department's EDL forms and maintain a paper record of the entire EDL.
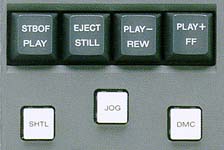
The very bottom of the display screen will sometimes show blocks with functions that have been assigned to the 8 function keys (4 upper case using the SHIFT key) which are located in the top center of the edit controller.
1. Power on. Turn on 2 power switches marked with yellow tape in the gray box in corner of isle in front of you as you enter the van. Don't touch ANY other switches in this box!
2. Initialize editor. This is done by holding down the
SHIFT key and pressing the INIT key found in the upper left hand corner of the editor.
Menu 1.
Menu 2.
Press FS to get to Menu 2.
Menu 3.
Press FS to get to Menu 3.
This lists GPI switches which are not used by our system, but which can be used to start other machines such as CD players on cue.
Menu 4.
Press FS to get to the 4th menu where you will see the following list:
At the bottom of the screen you will see flashing:
When initialization is completed, SHIFT and RETURN (in the extreme lower right hand corner of the editor) will
get you out of the initialization menu and give you the
edit screen.

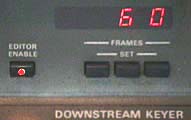
4. Enable the editor. Press the EDITOR ENABLE button on the
switcher (right over the Downstream Key buttons in the upper right corner).
5. Set record audio levels. Set the SOURCE keys on the 2000 editor to one of the players (eg. P#1), then press the OSC key on the audio mixer. Adjust the master faders (red) on the mixer to make both VU meters read 0 VU (all green LEDs and ONE red LED lit). On the record VCR adjust audio levels on both VU meters to -20 VU (just under the blue arrow on the display). Press the OSC button on the audio mixer again to turn the tone off.
6. Setup TBCs. Assuming you recorded your raw footage tapes with the correct exposure and color balance, you will want to place all of the processing amplifier controls (Video Level, Setup, Chroma, Hue, etc.) on both Panasonic TBCs to the PRESET positions by pushing in on the knobs corresponding to each control.
7. Select mode for editing. This is done using purple keys in the upper right hand corner of the editor. Default is VA12 for video and audio channels 1 and 2, insert mode. The active mode is displayed in the upper left hand corner of the computer monitor screen.
You often want to disable A2 to leave audio channel 2 open for music and effects. The switches work as toggles, so press the A2 key to disable audio channel 2, and again to re-enable it.
8. Select effect. This is done using the pink keys, and will normally be a cut, dissolve, or wipe. I recommend doing keys manually from the switcher. The default is a cut, so you only need to use these keys for dissolves and wipes, or to use the switcher manually.
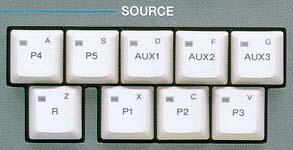
9. Machine selection. Select the machine you want to work
with (R, P#1, or P#2) by punching it up in the source
section.
Disk Assign.
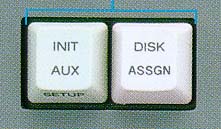
Unless someone has messed up the disk assign menu, crosspoints (which ports on the editor control which inputs on the switcher) are normally set correctly for A/B roll editing. If selecting specific machines as shown above yields unexpected results on the switcher (and the switcher really is in edit enable mode), the crosspoints may have been reassigned using the Disk Assign function. After you are sure everything else is set correctly, press the DISK ASSIGN key next to the INIT key in the upper left hand corner of the editor.
Port    Device Label       VTR ID   SWER XPT   MIXER XPT   MON V   MON A
 A      VTR                R        00         --          --      --
 B      VTR                P1       06         01          03      03
 C      VTR                P2       07         02          04      04
 D      LIVE (TBC1)        P3       06         03          05      05
 E      LIVE (TBC2)        P4       07         04          06      06
 F      LIVE (CAM1)        P5       01         05          07      07
#1      BLACK              AX1      00         07          09      09
#2      TEST               AX2      08         08          10      10
#3      CG                 AX3      05         09          01      01
SHIFT and RETURN will get you out of the Disk Assign mode and back to the editing screen.
10. Set source audio levels. Make sure the EXT MONITOR button (left of OSC) is in up position, then play source tapes, setting voice levels to peak at 0 VU and music levels to peak at -5 VU. Turn down all audio monitors in the van at this time and turn up the volume on the Record Monitor (over the audio board). Make sure the VTR input is selected by pressing the appropriate button on the bottom of the Record Monitor.
Press EXT MONITOR button down to hear the record machine only which is helpful when doing any edits involving audio. The VU meters will not be accurate with the monitor in this setting, however.
11. Mark in times. MARK IN (yellow key above ALL STOP) marks the present position of the active machine (the one selected on the source switcher). Remember that the machines can only read time code accurately at speed, so you will find it is best to mark in and out times with the tapes playing in real time.
12. Mark out times. MARK OUT works the same way, marking the current position of the active machine. If more than one out time is selected, the out time of the record machine will determine the end of the edit. If in doubt, mark out on the record machine, or transfer the duration from the player to the record machine.
13. Begin and end an edit manually. Hit the RECORD button once to begin an edit, and a second time to end it manually. NOTE: ALL STOP will end an edit, but will not record an end time in your EDL, so you will be unable to repeat this edit at a later time if you need to.
14. Exchange edit points. The out points on the recorder and all players used in an edit become the new in points automatically, once an edit is performed. For this reason it is a good idea to preview edits and make sure they are what you want before recording them. With time code it is unnecessary to overlap edits and performing wipes and dissolves is much easier if you determine an accurate end point before recording the preceding edit.
15. Replay. REPLAY will replay the whole edit. Be sure to replay edits involving wipes and dissolves immediately after recording them, looking closely for any shift in the picture at the beginning of the transition. The machines will occasionally miss the match frame for the transition and the best time to fix this is right away. In most cases recalling the edit (see #16) and re-recording it will fix the problem.
16. Recall. To redo an edit, push SHIFT and RECALL. Then enter the number of the edit on the keypad and hit ENTER. After you perform the edit, SHIFT and EXIT or SHIFT and RETURN will get you out of recall mode and allow new edits. It is essential that you do this to record new edits in your EDL! Make sure the display in the upper left corner of the computer monitor reads "New 044" (assuming you have already recorded 43 edits) to ensure you have exited recall mode.
17. Last edit. SHIFT and LAST EDIT loads the data for the last edit performed. Once you are satisfied with the edit, SHIFT and EXIT or SHIFT and RETURN will restore normal editing.
18. Edit from a paper EDL. To enter time code from the keypad- type in time code on the keypad, activate desired machine, then push SET IN or SET OUT (yellow keys on the right hand side of the editor).
19. Perform a dissolve. Remember that the editor cannot dissolve from the record machine to anything. In doing a dissolve, it cuts to the last frame of the last source used (so make sure to leave the tape in that machine), and then dissolves to the new source selected. In order not to get a jump cut, the editor must remember where the last edit ended on both the recorder and the source machine. A small flashing dot after the time code address on the editing screen tells you that the machine has this information in memory.
Press DISS as the effect (in the pink row of keys) and the screen will ask "From?" Press the source select key corresponding to your last edit source. "To?" will then show on the screen. Press the source select key of the machine or auxiliary source you want to dissolve to. "Transition?" will appear on the screen which is asking for the duration of the transition. On the keypad enter in seconds and frames the duration you desire. Then press ENTER.
Next cue the tape in the player you want to dissolve to. Enter the in time with SET IN or MARK IN. The in times for the record machine and the "from" machine should be entered automatically by the editor. Should you decide to move the in point of the dissolve back from the out point of the last edit, make this change for the record machine only. The editor will automatically maintain the match frames by adjusting the in time on the appropriate player.
If desired, an out time can be entered, but it should generally be entered for the record machine. If the play machine is more critical, mark the out time on it and transfer the shot duration to the record machine. A scrap piece of paper and a pencil are helpful.
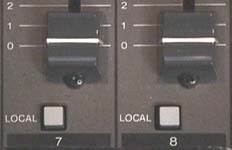
20. Audio cross fades. When performing a fade or dissolve,
the audio mixer will automatically perform a
corresponding audio fade if the LOCAL button is in the up
position for each channel used. If you get unexpected
audio on a dissolve, you should push the LOCAL button
down and pot down the VCR you are dissolving from.
22. Edit without time code. While not an issue with DVCpro tapes, you can edit using tapes in other formats which lack time code, however the edit points will not be as accurate as when using time code. To edit using control track, select the desired machine in the source section and press CTRL and TC/CTL. A small "c" will appear after the address numbers. Be sure to repeat the procedure before loading a tape with time code in that machine.
23. Avoid menu lock. Be VERY CAREFUL not to press any keys you do not understand. The editor is easy to get locked into a menu mode where it will not respond to commands. SHIFT and RETURN will get you out of most menus, however.
If the Chyron CG computer is on, be sure to shut it down before turning off power to the equipment. If the program is on screen, use the mouse to click on the X in the upper right hand corner of the screen.
Click on the START button and select Shut Down. Click on OK in the Shut Down menu and wait for the computer to shut itself off. This step is critically important!
Once you are sure the CG is shut down properly, remove your tapes from the VCRs and your disk from the 2000 disk drive. Shut off the two switches with the yellow labels (and only these two switches) in the junction box behind the engineering racks.
