Operating the Hitachi Z-4000W Camera in Studio Mode

Hitachi Z-4000W in Studio Configuration
Hitachi Z-4000W in Studio Configuration
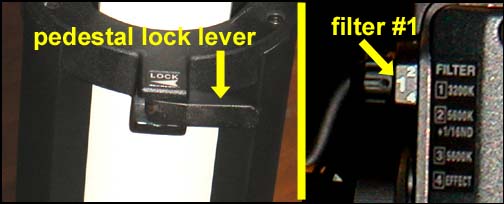
2. Unlock the pedestal by flipping black latch lever under camera head. Pedestal camera up to a comfortable height, usually even with the talent's eyes. Tighten the pedestal lock unless a live pedestal movement is required.
4. Put on headset and make sure the intercom is on the correct channel (usually PD) selected by a switch on the rear of the camera. Make sure the Mic switch on left side of camera body is OFF. Push the chrome Mic switch down and hold to talk to the director when necessary, OR press the button under the zoom control with your right index finger to talk--release to listen. Adjust volume control below Mic switch for a comfortable level.

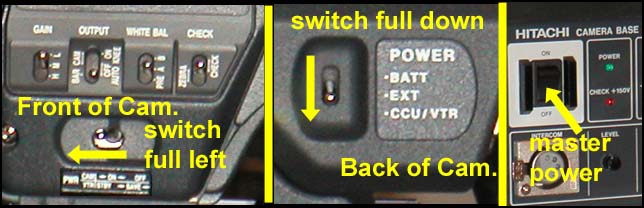
6. If you do not get a picture in your viewfinder, ask the instructor or engineer to power the camera from the master switches located near the CCUs. These should be turned on until the power indicator light stays on, then turned off and back on. This sequence is necessary to power the prompters.
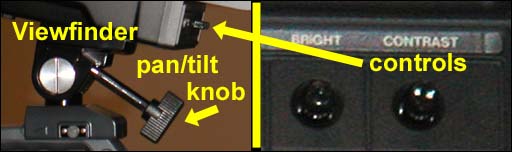
7. With the tilt lock (on the right side of the camera mounting head) finger tight, loosen the viewfinder pan/tilt knob and position the viewfinder for maximum comfort. Once positioned, tighten the viewfinder pan/tilt knob finger tight and reach up to the bottom of the viewfinder and adjust the Brightness and Contrast controls until the image in your viewfinder is sharp and suits your eyes.
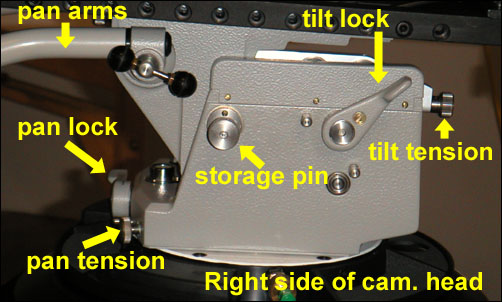
8. Make sure the camera is zoomed in on a tight shot and then loosen pan and tilt locks using the levers on rear (Pan) and right side (Tilt) of the mounting head). If the camera will not tilt, pull out the Storage Pin located behind the tilt lock lever. The pan and tilt tension settings should be correct for most operators, but adjust them as necessary. The pan and tilt locks should be loose when operating the camera and finger tight when leaving the camera.

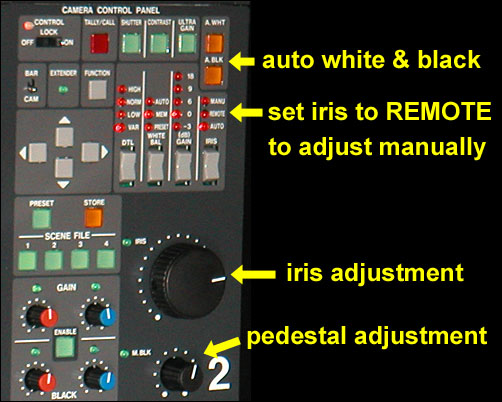
The digital signal processing (DSP) chip in the Hitachi cameras is probably the most sophisticated in the industry. In a studio lighting situation, the cameras only need to be white and black balanced using the corresponding buttons on the CCU and they should function flawlessly in full automatic mode, producing consistent picture quality whether focused on the brightest or darkest part of the set.
If you want to shade the cameras (control the luminance of the signal) manually, set the iris control to REMOTE, and adjust white level with the large Iris knob and black level with the smaller Master Black (Pedestal) knob. The Scene File #1 button will flash, asking if you want to store the current settings. Since the point of manual operation is to be able to continuously adjust luminance, simply ignore the flashing light.
1. At the end of each production, remove your headset and place it on one of the handle bars. Then GENTLY lock the tilt lock finger tight.
2. At the end of class, remove your headset and place it on one of the handle bars. Pedestal the camera all the way down and lock the pedestal. With the camera head in a level position, push the Storage Pin in to lock the tilt completely. Then loosen the tilt lock to full off.
3. Move the camera back to its storage position, getting someone to help you figure 8 the cable as you move.
4. If there is not an instructor or engineer present, power the cameras off using the master switches located near the CCUs. This should be done BEFORE the circuit breakers powering the entire control room are turned off.
