2. Turn on the power switch which is deeply recessed on the lower left side of the camcorder.

4. For best color rendition, set the automatic white balance switch to MEMO (for memory). ATW (auto tracking white balance) can be used in an emergency, but is not as accurate as setting white balance with a white card using the MEMO setting.
5. Set output to CAM and shutter to OFF for normal recording.
6. Make sure that the neutral density (ND) filter is OFF unless shooting in very bright conditions. It can also be used as a special effect to compress depth of field.
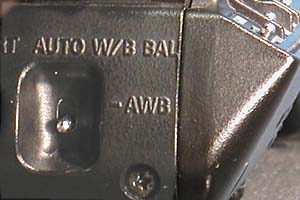
7. Perform a white balance by holding a white piece of paper in the light which will illuminate the subject, focusing the camera on it, and then going out of focus to blurr the image. Carefully reach under the lens and push up on the auto white balance (AWB) switch. The image in the viewfinder will go to black for an instant and then return to normal. This process correctly sets not only color, but also the pedestal (black level) setting.

9. For most recording situations, leave the iris in automatic mode. The switch is located in front of the zoom rocker and is labeled A and M for auto and manual.
10. Frame your shot as desired using the zoom rocker switch. The speed of the zoom is controlled by the pressure applied. Set focus by zooming all the way in on the subject and turning the sun shade on the front of the lens until the image appears in focus. Then zoom out to the desired shot. If the subject does not remain in focus, check that the MACRO switch on the back of the lens is in the off position and adjust back focus if necessary.
11. Depress the record button, normally under your right thumb if you are handholding the camera. Remember to let the tape roll for 10 seconds before cueing talent. When the shot is completed, press the record button a second time to stop/pause the tape.
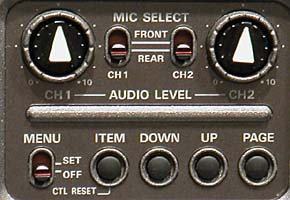
12. If recording audio, the camera mic is of very poor quality and should not be used. On the audio control section located at the back of the camera on the left side, set both channels to REAR and plug suitable mics into the jacks below the battery compartment on the back of the camera.

14. Adjust the audio level pots until each channel shows an occasional + sign, but shows mostly dashes. More than an occasional single + sign indicates too high an audio level.
15. There is a small speaker located by your right ear if you handhold the camera. It is of very poor quality and audio should be monitored with the earphones provided which plug into the rear of the camera.
16. Turn off the camcorder when not in use to conserve battery power and to unwrap the tape from the record head.
17. When moving the camcorder any significant distance, it is safest to return it to the PortaBrace case, making sure to replace the lens cap.
