The time code signals contain at least three parts: frame address, color phasing information, and user bits. The frame address is the actual number of the frame expressed in a clock-like format beginning at 00:00:00:00 and ending at 23:59:59:29. The color phasing information keeps the edits clean when editing between different formats, and helps within some formats. The user bits are letters or numbers assigned by the user, often to designate reel or cassette numbers.
In order to allow for the 29.97 fps of NTSC color video, modern time code editors can compute drop frame time code. With non-drop frame editing a one hour show would be off by 3 seconds and 6 frames. To compensate, the time code generator drops selected time code numbers (not frames of video). Longer programs intended for broadcast are always edited with drop frame time code. Few editors use it for other types of programming because it is possible to come up with an EDL that specifies frame numbers that do not exist.
DVCPro time code must be recorded at the same time as the video information. While some producers do "post stripe" video tape, most videographers record time code as they shoot. For shorter projects, the hour code may be used as a cassette numbering system. This can pose a problem with tapes longer than 60 minutes, however. When using these tapes, the user bit is often used to designate reel numbers. By convention, the 0 numbered tape is used as an editing work tape.
For longer projects, time-of-day time code is often used, with the user bit used to designate shooting days. The time code generator is set to "free run" so it runs constantly like a clock, whether or not the tape is rolling. This can be helpful because footage can be logged with a wristwatch. Unfortunately our DVCPro camcorders don't allow the user to set the time code to time-of-day, so this technique requires more expensive equipment.
On the edit master tape I prefer to begin time code at 00:59:00:00, allowing for one minute of technical standards (30 secs. bars/tone, 20 secs. slate, 10 secs. black or CD). The program then begins at 01:00:00:00. Beginning the program at 00:00:00:00 poses a problem. Since the editor has to back up for preroll, it will try to roll back to larger time code numbers on your first edit, and most editors will not do this.
Component vs. Composite Formats.
U-Matic, VHS, 8mm and Type C 1 inch are all composite formats. Betacam, Super VHS and Hi 8mm are component systems, using the Y/C system of dividing the signal into luminance and chroma.
Some component systems including DVCPro use the Y-R, Y-B technique developed for the Sony Betacam SP format and hence often called "Betacam Component." This system measures the luminance and the red and blue chroma signals, constructing green by measuring chroma that isn't red or blue (designated Y-PB-PR by Panasonic), and the really high-end systems (D1 and D5) use the computer standard of RGB plus luminance. This allows for the most accurate manipulation of the signal.
Any component system will require special switchers and processors, while composite formats can be hooked together directly and can use any type of processor. The advantage of the component systems is cleaner color rendition and easier manipulation of color information.
Video Measurement.
An analog video signal includes pulses that tell the monitor how to light up its phosphor dots, pulses that tell it how to scan, and pulses that tell it when to scan. All of this is accomplished by varying the voltage traveling down a cable.
Analog video is measured with a waveform monitor for luminance and a vectorscope for chroma. A pulse-cross monitor is also helpful to see a visual presentation of the blanking interval. It will sometimes show a defect in an edit that is not readily visible on the tape played at normal speed, but which may cause problems as the master is dubbed, processed, and transmitted.
From a practical perspective, waveform monitors make it possible to match luminance levels exactly (well, to some extent), while a vectorscope can aid in color matching.
Time base correctors (TBCs) replace the rather inexact sync of a video tape or other device with clean electronic sync, allowing images from a variety of sources to be combined. Most TBCs have a processing amplifier (proc. amp.) which allows control of 4 components of the image:
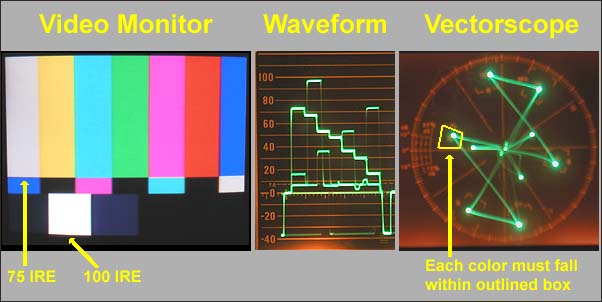
Color bars on the front of a tape can help editors set up playback machines to accurately reproduce the colors encoded by the camera. Using a waveform monitor in flat, 2 H mode, adjust the pedestal control on the TBC proc. amp. to place the black level at 7.5 IRE/IEEE units (indicated by a small dotted line). White level for the left bar is usually set at 75 IRE/IEEE units (NOT 100 IRE units). Split field bars have a small block at the bottom that IS set at 100 IRE units. Using a vectorscope, you can adjust the phase control on the TBC proc. amp. until the display dots come as close as possible to the small crosses on the display.a. Phase (hue)- this is similar to the "tint" control on a home TV and adjusts the color balance in the green--magenta axis. All colors are affected.
b. Chroma (saturation)- is similar to the "color" control on a home TV.
c. Gain (video level)- is basically a contrast adjustment. Turning it up makes both the bright areas brighter, and the dark areas darker.
d. Pedestal (setup or black level)- is similar to the "brightness" control on a home TV. It determines at what brightness level an image can be seen. Using a Waveform monitor, this should always be set at 7.5 IRE/IEEE units for analog video and 0 units for digital video. Many problems with mixing analog and digital video result from either doubling the 7.5 pedestal setting, or lowering it below 0 which will interfer with sync.
When editing cuts-only without TBCs, you may want to use the component position on the video input switch labeled Y PB PR. This will give you slightly cleaner chroma than the CMPST (composite) setting, but the difference will only show up after several generations. When editing in an A/B roll room, be sure to use the CMPST (composite) input setting only because our switchers (which are doing the A/B roll effects) are not component-capable.
Unfortunately the industry is just developing objective measurement devices comparable to waveform monitors and vectorscopes for digital video signals. When digitizing video using a "firewire" port, it is not possible to make any corrections to either the audio or the video. While most non-linear editing systems allow for audio and video enhancement to the files once they have been digitized, this can be a tedious process, so care should be taken to record the signal correctly when shooting.
Audio Measurement.
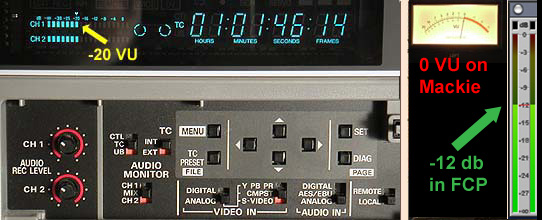
The VU meter provides an objective measure of volume in much the same way vectorscopes and waveform monitors measure video. Always set record levels to a 1,000 Hz tone before any editing session. Audio levels should be set to -20 VU (there is a small blue arrow above) on the DVCPro deck to correspond with 0 VU on the master audio board.
Apple has designated -12 as the optimal recording level, so when digitizing audio clips into Final Cut Pro, try to adjust input levels so that -20 on the DVCPro tape corresponds with -12 on the computer. This will only be possible if using an analog output on the DVCPro deck (or an analog recorder). Firewire does not allow for any audio or video manipulation of the signal during digitizing, however a DVCPro tape with audio peaked at -20 db will result in an FCP clip with audio peaking at -12 db. Contrary to information in the text, I have found that I can begin to hear audio distortion in clips peaking slightly higher than -6 db (the yellow range of the FCP audio meter) so make this your absolute peak for explosions and other high volume sounds.
Editing Concepts.
Virtually all linear video editing involves copying scenes from a source tape, disk, etc. onto another piece of media. For most formats of video you will need one source machine for each picture element to be combined in a transition or effect.
Some newer digital formats provide a "read ahead" feature which allows a few frames to be held in memory, combined with new material, and recorded back on the tape in one step. A/B roll editing can be done on these systems using only two machines. Panasonic markets a laptop DVCPro editor with this capability, bringing the flexibility of fades and dissolves to the editor in the field. P-2 solid state camcorders and a laptop running an NLE program may soon replace this system for news and sports, which are now major users of A/B roll editing.
A cut edit is defined by two in points and ONE out point. This is called "3-point editing" and the theory applies to non-linear editing as well as tape editing. On our A/B roll editors the record machine's out point always takes precedence. If you happen to set an out time on a player, be sure to transfer it to the recorder before recording the edit or you may get unexpected results.
When doing an open-ended edit on any of our linear (tape) editors, never end the edit with the "all stop" button. This is a panic button which can be used to abort an edit that is not what you want, but all pre-set in and out points will remain in memory. Ending edits with all stop means you don't get out points added to your electronic EDL and you sometimes get a glitch at the edit point. To end an open-ended edit, press the edit button a second time.
For A/B roll editing or A/B/C etc. you will need an in point for each source.
The process.
A tight script is the best tool to aid in shooting and editing an effective production.
The master log is a chart of where each piece of footage is located. It can get quite complex for a long production with a lot of raw footage.
While footage is being shot, a rough log is kept. When using time-of-day time code, a watch can be used to get time code approximations. This rough shooting log should contain descriptions of each shot and notes on technical or talent errors.
A crude form of off-line editing is to use VHS or DVD window dubs and create a list of shots, the order in which they should come, the type of transitions, and where the footage is located. This is called a paper edit, and the final document is a paper EDL. We have forms to help with this process.
Off-line tape editing usually uses window dubs and actually edits together a work tape. This is valuable to show to the client for approval before going to an expensive on-line suite, and can save money through speeding up the on-line process.
The on-line edit is done using the original raw footage, effects generators, titlers, etc. to make a high quality finished product. The concepts of off-line editing using low quality footage and on-line editing using only the relevant clips at high quality has migrated to the non-linear editing world. For long-form projects with a lot of raw footage, digitizing is sometimes done at low (VHS quality) resolution. Once the project is edited and approved by the client, the batch digitize feature of most NLE systems will re-digitize only the relevant clips at high resolution and conform the project to the low resolution version.
A script marked with director's notes and even time code addresses of good takes will make the editor's job easier.
Logging footage is best done with window dubs which can be created on DVD from Final Cut Pro.
The shooting log is usually much more detailed for a single camera production. Often a marked script is sufficient for multi-camera projects.
For documentaries where a script is not written in advance and information is obtained through interviews, it is often a good idea to transcribe the actual dialog and build a script on the logging sheet.
For an involved project, there is a tremendous amount of material to keep track of. Most producers use some sort of computer database for this purpose. Commercially available programs like Log Producer can be very helpful.
